

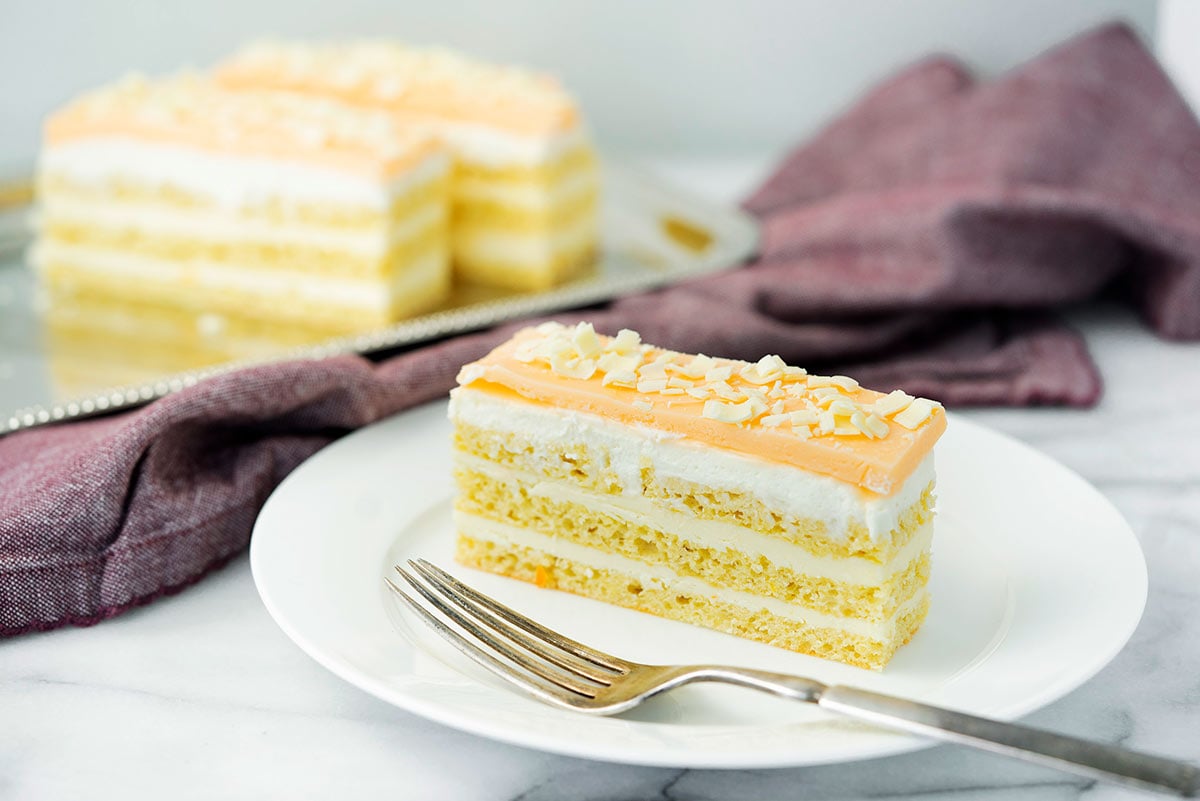
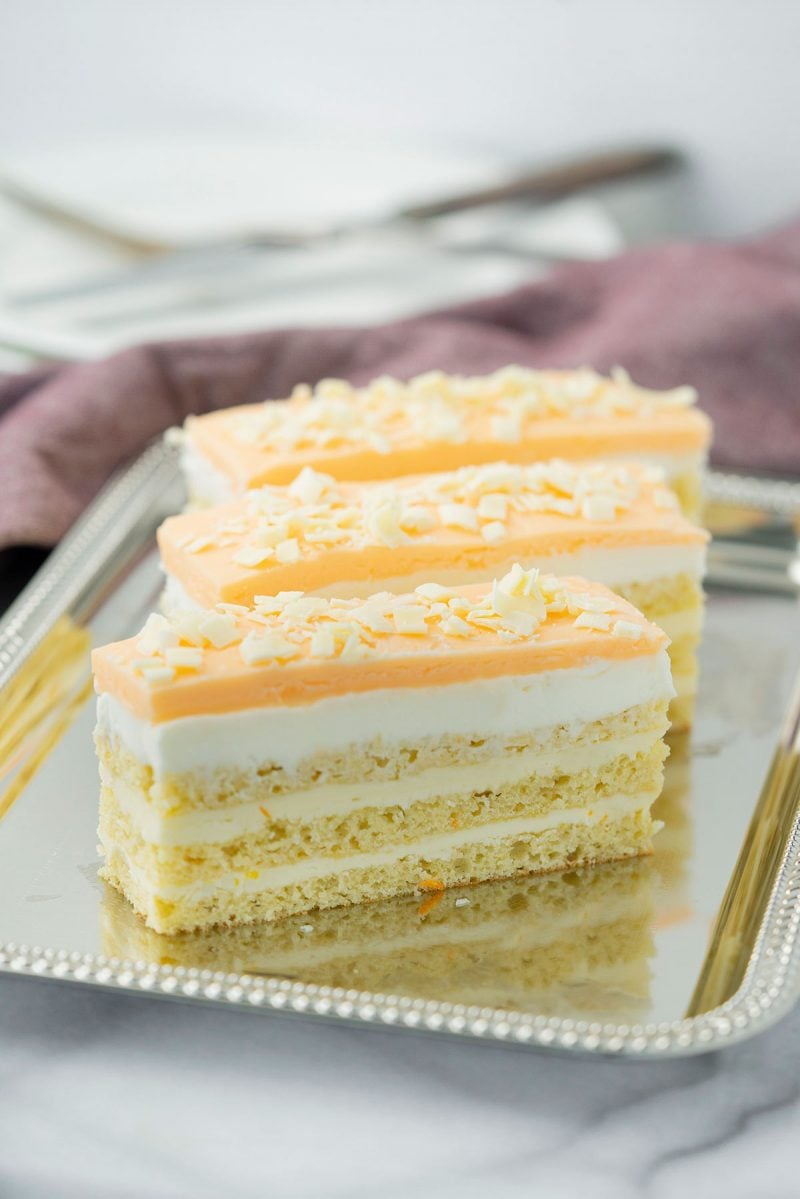
Orange creamsicle meets French elegance in this Opera Cake Recipe featuring delicate almond layers, citrus buttercream, and white chocolate ganache. A stunning dessert for special occasions.
WANT TO SAVE THIS RECIPE?
Enter your email below and we’ll send it straight to your inbox. Plus you’ll get great new recipes from us every week!
Quick Recipe Overview
WHAT: A sophisticated French layer cake with orange-flavored almond sponge, buttercream, white chocolate ganache, and glossy glaze.
WHY: This showstopping dessert combines creamsicle nostalgia with elegant French technique for unforgettable special occasions.
HOW: Bake thin joconde layers, brush with orange syrup, then stack with buttercream and ganache before glazing.
Jump to:
- Quick Recipe Overview
- Why I Love Making Opera Cake
- What is Opera Cake?
- Ingredient Notes
- Opera Cake Recipe
- How to Make Orange Creamsicle Opera Cake
- Assembling the Opera Cake
- Serving
- FAQs for Opera Cake Recipe
- My Best Tips for Making Opera Cake
- What to Serve With Opera Cake
- Storage & Reheating Tips
- More Beautiful Layer Cake Recipes
- More Desserts Recipes to Try
Why I Love Making Opera Cake
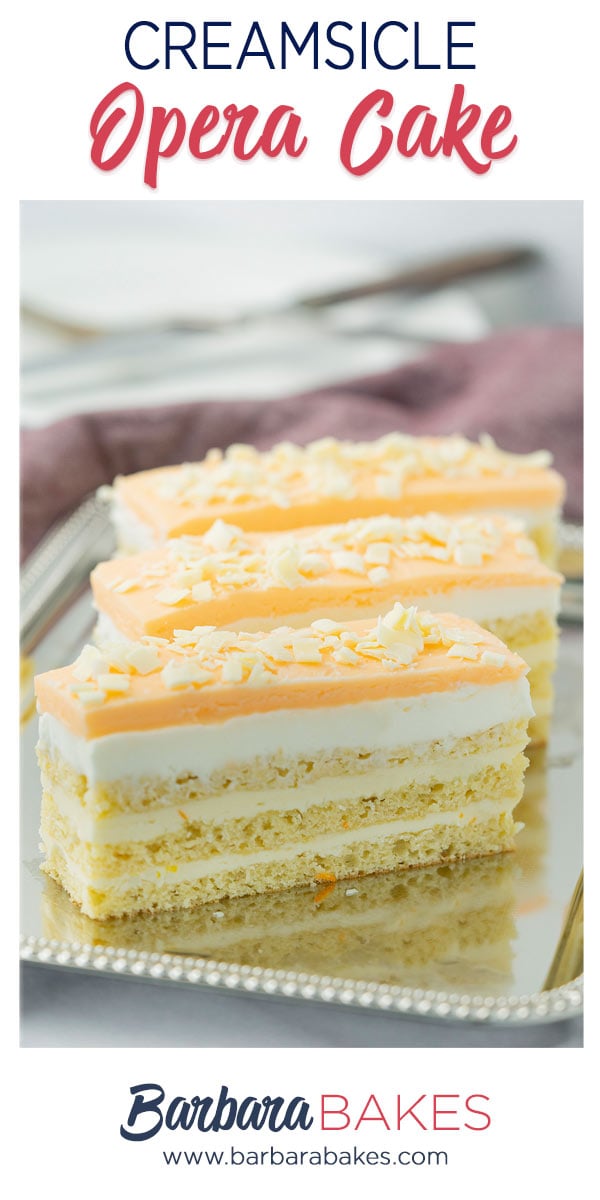
This creamsicle opera cake holds a special place in my baking repertoire. While traditional opera cake features coffee and chocolate, this orange-kissed version turns the French classic into something unexpectedly nostalgic – like those beloved orange creamsicle pops from childhood, but elevated into an elegant layered dessert.
I won’t lie – this is an ambitious project. But that’s exactly why I love it. The joconde sponge bakes up impossibly light, the orange buttercream spreads like silk, and that white chocolate ganache adds the perfect creamy contrast. Each component can be prepared ahead, making the final assembly feel less daunting.
What really wins me over is how this cake tastes even better the next day. Those layers of almond cake soaked in orange syrup, buttercream, and white chocolate mousse get a chance to settle together in the refrigerator, creating something truly spectacular. It’s become my signature dessert for special celebrations.

🩷 Melissa
The flavor of creamsicle always reminds me of summer. The classic ice cream treat has always been a favorite in my family. So I decided to upgrade the creamy citrus layers into a beautiful and sophisticated opera cake.
This cake is a special occasion treat that will impress your family or friends. It has a creamy and refreshing orange creamsicle flavor perfect for summer.
What is Opera Cake?
Opera cake is a traditional French cake made by layering almond sponge cake with buttercream frosting. On top is a shiny glaze.
The almond sponge cake is also called joconde. It’s light and airy and gets most of its flavor from a simple syrup that you’ll brush over the top of the cake.
Most traditional Opera Cakes are flavored with chocolate ganache and vanilla buttercream. We made a twist by adding orange flavor and white chocolate mousse.
Ingredient Notes
Almond flour: Use finely ground blanched almond flour, not almond meal. The texture difference is significant for achieving a smooth, refined joconde.
Grand Marnier: This orange liqueur enhances the creamsicle flavor. Substitute with additional orange juice and ½ teaspoon orange extract if avoiding alcohol.
Orange gel food coloring: Just 1-2 drops in the glaze creates that signature creamsicle look. Liquid food coloring can thin the glaze too much.
Heavy cream (35%): Essential for proper ganache consistency. Lower fat content won’t whip properly or set correctly.
See the recipe card below for full information on ingredients and quantities.

WANT TO SAVE THIS RECIPE?
Enter your email below and we will send it straight to your inbox. Plus you will get great new recipes from us every week!

Opera Cake Recipe
Equipment
Ingredients
Joconde
- 6 large egg whites at room temperature
- 2 tbsp. 30 grams granulated sugar
- 2 cups 225 grams almond flour
- 2 cups icing sugar sifted
- 6 large eggs
- ½ cup 70 grams all-purpose flour
- 3 tbsp. 1½ ounces; 45 grams unsalted butter, melted and cooled
Simple Syrup
- ½ cup 125 grams water
- ⅓ cup 65 grams granulated sugar
- 1 tablespoon fresh orange juice
- 1 tablespoon almond or vanilla extract
Buttercream
- 1 cup granulated sugar
- 4 large egg whites room temperature
- 12 ounces unsalted butter room temperature
- ¼ cup fresh orange juice
- 1 teaspoon vanilla extract
- 1 tablespoon orange zest
White Chocolate Ganache/Mousse
- 7 ounces white chocolate
- 1 cup plus 3 tablespoons heavy cream 35% cream
- 1 tablespoon Grand Marnier liqueur
Glaze
- 14 ounces white chocolate coarsely chopped
- ½ cup heavy cream 35% cream
- 1 -2 drops of orange gel food coloring
Instructions
- JocondeNote: The joconde can be made up to 1 day in advance and kept wrapped at room temperature
- Divide the oven into thirds by positioning a rack in the upper third of the oven and the lower third of the oven.
- Preheat the oven to 425°F. (220°C).
- Line two 12½ x 15½- inch (31 x 39-cm) jelly-roll pans with parchment paper and brush with melted butter.
- In the bowl of a stand mixer fitted with the whisk attachment (or using a handheld mixer), beat the egg whites until they form soft peaks. Add the granulated sugar and beat until the peaks are stiff and glossy. If you do not have another mixer bowl, gently scrape the meringue into another bowl and set it aside.6 large egg whites, 2 tbsp. 30 grams granulated sugar
- If you only have one bowl, wash it after removing the egg whites or if you have a second bowl, use that one. Attach the paddle attachment to the stand mixer (or using a handheld mixer again) and beat the almond flour, icing sugar and eggs on medium speed until light and voluminous, about 3 minutes.2 cups 225 grams almond flour, 2 cups icing sugar, 6 large eggs
- Add the flour and beat on low speed until the flour is just combined (be very careful not to overmix here!!!).½ cup 70 grams all-purpose flour
- Using a rubber spatula, gently fold the meringue into the almond mixture and then fold in the melted butter. Divide the batter between the pans and spread it evenly to cover the entire surface of each pan.3 tbsp. 1½ ounces; 45 grams unsalted butter, melted and cooled
- Bake the cake layers until they are lightly browned and just springy to the touch. This could take anywhere from 5 to 9 minutes, depending on your oven. Place one jelly-roll pan in the middle of the oven and the second jelly-roll pan in the bottom third of the oven.
- Put the pans on a heat-proof counter and run a sharp knife along the edges of the cake to loosen it from the pan. Cover each with a sheet of parchment or wax paper, turn the pans over, and unmold.
- Carefully peel away the parchment, then turn the parchment over and use it to cover the cakes. Let the cakes cool to room temperature.
- Simple Syrup(Note: The syrup can be made up to 1 week in advance and kept covered in the refrigerator.)
- Stir all the syrup ingredients together in the saucepan and bring to a boil.½ cup 125 grams water, ⅓ cup 65 grams granulated sugar, 1 tablespoon fresh orange juice, 1 tablespoon almond or vanilla extract
- Remove from the heat and let cool to room temperature.
- Buttercream:Put the sugar and egg whites in the medium heatproof bowl and fit the bowl over a plan of simmering water. Whisk the mixture constantly over medium heat, until it feels hot to the touch, about 3 minutes. The sugar should be dissolved, and the mixture will look like shiny marshmallow cream. Remove the bowl from the heat.1 cup granulated sugar, 4 large egg whites
- Working with the whisk attachment, beat the meringue on medium speed until it is cool, about 5 minutes. Switch to the paddle attachment and add the butter a stick at a time, beating until smooth. Once all the butter is in, beat the buttercream on medium-high speed until it is thick and very smooth, 6-10 minutes. During this time the buttercream may curdle or separate – just keep beating and it will come together again.12 ounces unsalted butter
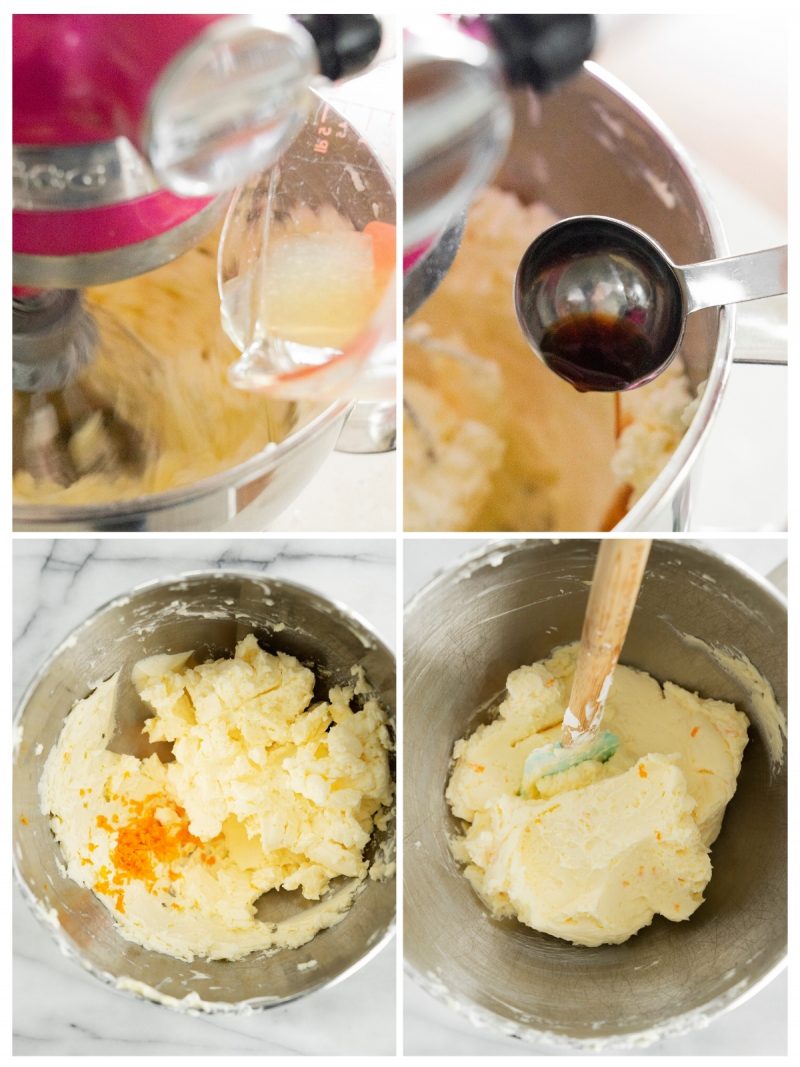
- On medium speed, gradually beat in the orange juice, waiting until each addition is absorbed before adding more, and then beat in the vanilla. You should have a shiny velvety smooth buttercream. Stir in orange zest. Press a piece of plastic against the surface of the buttercream and set aside briefly.¼ cup fresh orange juice, 1 teaspoon vanilla extract, 1 tablespoon orange zest
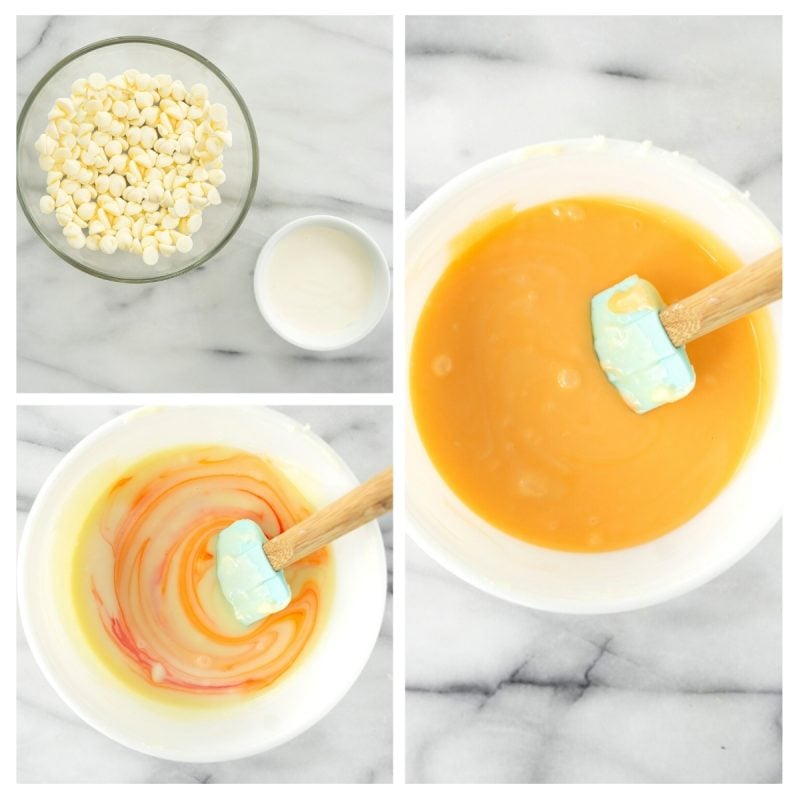
- White Chocolate Ganache Mousse:(Note: The mousse can be made ahead and refrigerated until you’re ready to use it.)
- Melt the white chocolate and the 3 tbsp. of heavy cream in a small saucepan.7 ounces white chocolate, 1 cup plus 3 tablespoons heavy cream
- Stir to ensure that it’s smooth and that the chocolate is melted. Add the tablespoon of liqueur to the chocolate and stir. Set aside to cool completely.1 tablespoon Grand Marnier liqueur
- In the bowl of a stand mixer, whip the remaining 1 cup of heavy cream until soft peaks form.1 cup plus 3 tablespoons heavy cream
- Gently fold the whipped cream into the cooled chocolate to form a mousse.
- If it’s too thin, refrigerate it for a bit until it’s spreadable.
- If you’re not going to use it right away, refrigerate until you’re ready to use.
- Orange GlazeNote: It’s best to make the glaze right when you’re ready to finish the cake.
- Melt the white chocolate with the heavy cream. Whisk the mixture gently until smooth.14 ounces white chocolate, ½ cup heavy cream
- Let cool for 10 minutes and then pour over the chilled cake. Using a long metal cake spatula, smooth out into an even layer.
- Place the cake into the refrigerator for 30 minutes to set.
- Assembly(Note: The finished cake should be served slightly chilled. It can be kept in the refrigerator for up to 1 day).
- Line a baking sheet with parchment or wax paper.
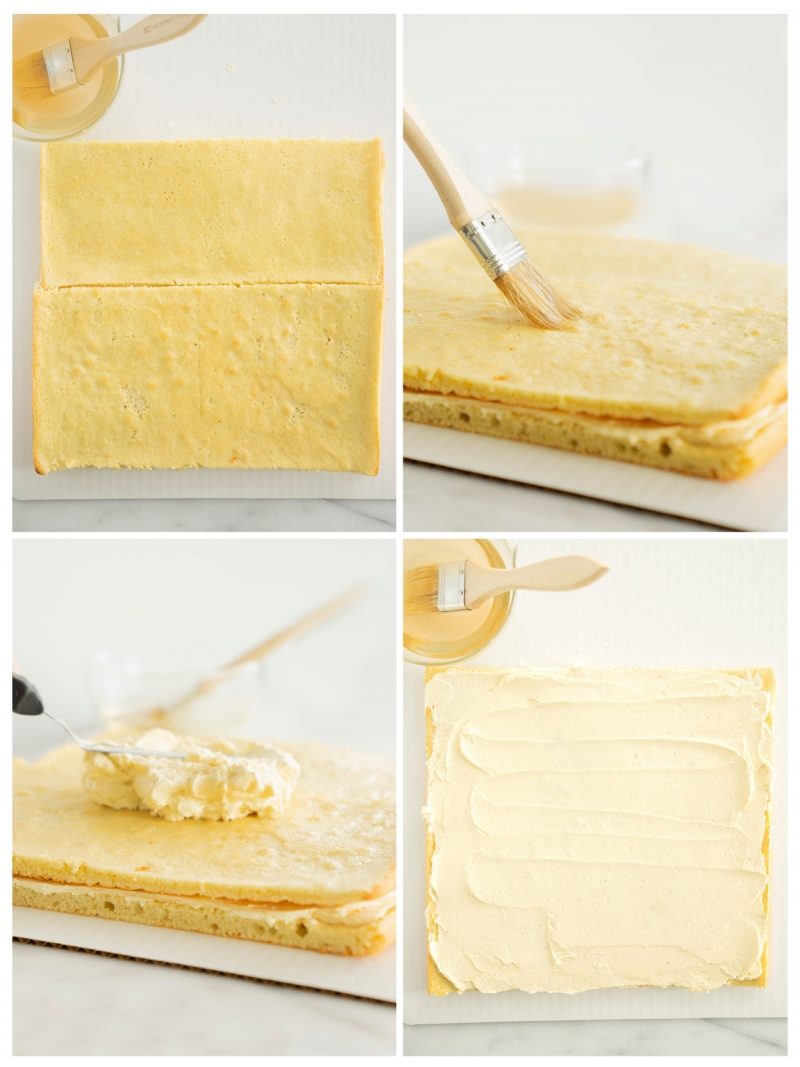
- Working with one sheet of cake at a time, cut and trim each sheet so that you have two pieces (from each cake so you’ll have four pieces in total): one 10-inch (25-cm) square and one 10 x 5-inch (25 x 12½-cm) rectangle.
- Place one square of cake on the baking sheet and moisten it gently with the flavoured syrup.
- Spread about one-half of the buttercream over this layer.
- Top with the two rectangular pieces of cake, placing them side by side to form a square. Moisten these pieces with the flavoured syrup.
- Spread the remaining buttercream on the cake and then top with the third square of joconde. Use the remaining syrup to wet the joconde and then refrigerate until very firm (at least half an hour).
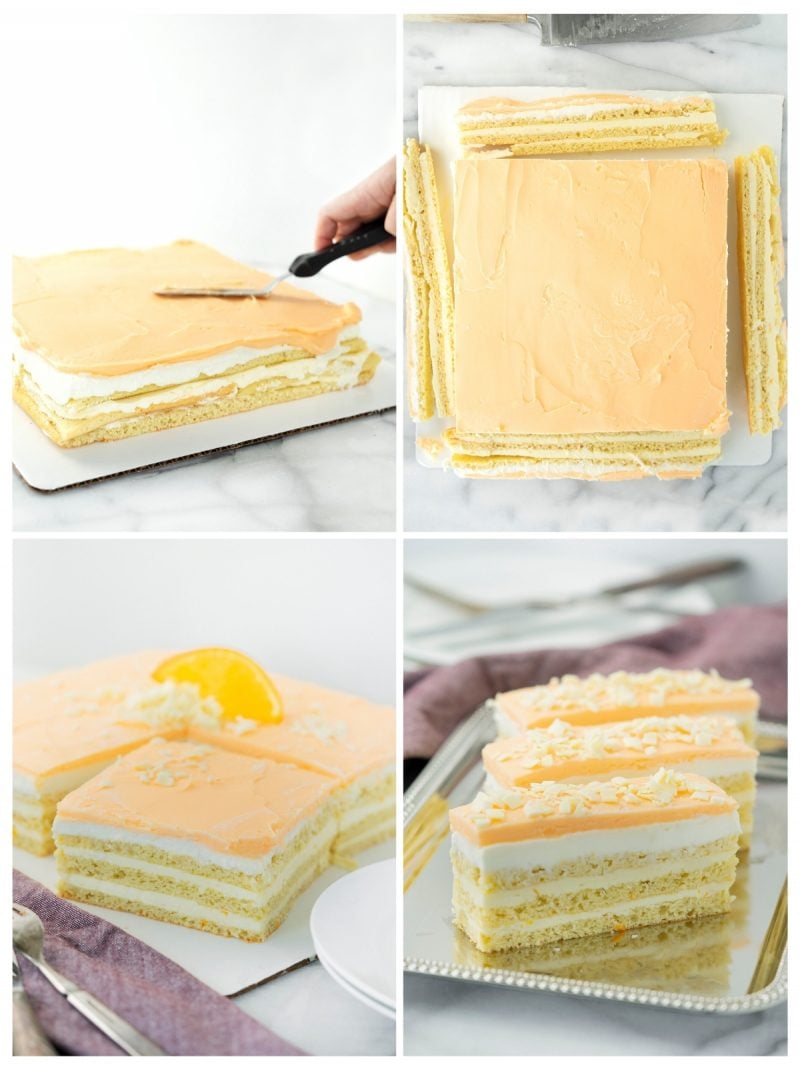
- Prepare the ganache/mousse (if you haven’t already) and then spread it on the top of the last layer of the joconde. Refrigerate for at least two to three hours to give the ganache/mousse the opportunity to firm up.
- Make the glaze and after it has cooled, pour/spread it over the top of the chilled cake. Refrigerate the cake again to set the glaze.
- Serve the cake slightly chilled
Notes
Nutrition
How to Make Orange Creamsicle Opera Cake
To easily pull off this cake, I recommend making the joconde first and letting that cool. Then make the sugar syrup, the buttercream and the white chocolate mousse.
Joconde
Before making the almond sponge cake, make sure you’re using fresh almond flour. Instead of a leavener like baking powder or soda, the cake rises from foamed egg whites. That’s why it’s important to very gently fold the egg whites into the batter to avoid deflating all that air.
When pouring the batter into the baking sheet, make sure it’s lined fully with parchment paper. For good measure, give the parchment a good spray with nonstick spray too.
Note: The cake bakes up quickly, so keep your eye on it. Ours was done in eight minutes.
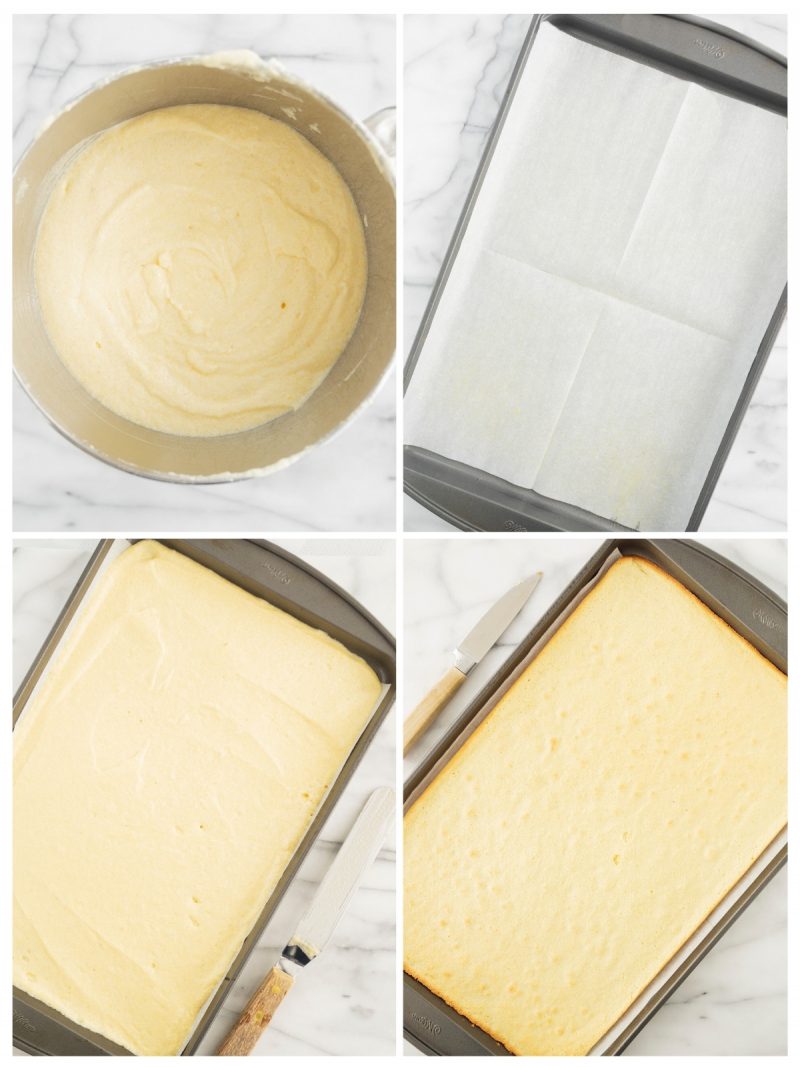
How to Cut Almond Sponge Cake
To cut your cooled joconde for this opera cake, you’ll want two squares and two rectangles. The rectangles will be placed together to form a square, the middle layer.
Simple Syrup
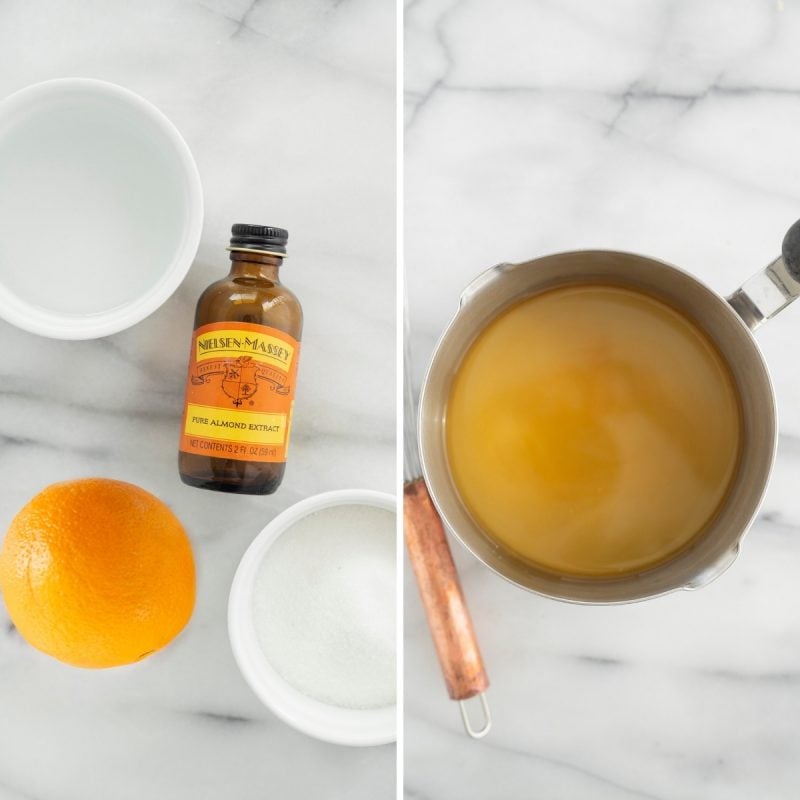
Prepare orange syrup by boiling water, sugar, orange juice, and extract.
Marshmallow Buttercream
The layers of almond sponge cake get spread with creamy marshmallow buttercream. This recipe is similar to a Swiss meringue buttercream. You will warm the egg whites and sugar until the sugar is dissolved, then let it cool.
Note: The egg white mixture must be at room temperature before you add the butter or the butter will melt. You can either let it sit before whipping into a meringue or make the meringue and let it sit until at room temp.
When you add the orange juice, it’s normal that the buttercream doesn’t easily absorb the liquid. Just keep mixing until it is fully incorporated, it will come together.
White Chocolate Mousse
To make a light and fluffy white chocolate mousse layer for your opera cake, make sure your white chocolate ganache is cooled to room temperature before folding into the whipped cream. And make sure not to beat the white chocolate ganache into the whipped cream or it will separate and become unusable. Instead, gold it gently.
Opera Cake Glaze
The glaze on this cake is a simple, but very pretty, white chocolate ganache tinted orange.
When you add the glaze, make sure your cake is at room temperature and the glaze is at a nice pourable temperature. If it’s too warm, the glaze will melt your mousse. If it’s too cold, it will stiffen and won’t pour or spread easily.
Assembling the Opera Cake
Here is the order in which to build your creamsicle opera cake:
- Square cake layer
- Simple syrup
- Buttercream
- Layer (2) rectangle layers to create a square
- Simple syrup
- Buttercream
- Square cake layer
- Simple syrup
- White chocolate mousse
- Glaze
Once the cake is assembled and chilled, you’ll want to trim off some of the messy edges. Use a nice sharp serrated knife to true things up.
For garnish, I like a sprinkle of shaved white chocolate and an orange slice.
Serving
The cake itself cuts pretty easily with a sharp knife. For best results, run the blade under hot water before slicing.
FAQs for Opera Cake Recipe
Almond flour is essential to the joconde sponge’s texture and flavor. Regular flour won’t produce the same delicate, moist layers that define opera cake. If you have nut allergies, this recipe unfortunately won’t work with substitutions.
The white chocolate mixture starts as ganache but transforms into mousse when you fold in whipped cream. This creates a lighter, fluffier layer that contrasts beautifully with the dense buttercream.
White chocolate is crucial for achieving the creamsicle flavor profile. Milk or dark chocolate would completely change the taste, making it more like traditional opera cake rather than this orange creamsicle version.
My Best Tips for Making Opera Cake
☞Perfect Your Meringue: Beat egg whites to stiff, glossy peaks before folding into the almond mixture. Under-beaten meringue won’t give the joconde its characteristic light texture.
☞Don’t Overbake the Joconde: Watch carefully – these thin layers only need 5-9 minutes. They should be lightly browned and springy to touch. Overbaking creates dry, crumbly cake.
☞Syrup Soaking Technique Matters: Use a pastry brush to gently moisten each layer rather than pouring syrup directly. You want moist cake, not soggy.
☞Chill Between Layers: Refrigerate for at least 30 minutes after adding buttercream and 2-3 hours after the ganache. This makes the final glaze step much easier and cleaner.
☞Smooth Glaze Application: Let the glaze cool for 10 minutes before pouring – too hot and it runs off, too cool and it won’t spread smoothly. Use a long offset spatula for the most professional finish.
What to Serve With Opera Cake
This rich, elegant dessert pairs beautifully with espresso or cappuccino to balance the sweetness. For a French-inspired coffee service, offer small cups of strong coffee alongside thin slices of cake.
Fresh berries – especially raspberries or strawberries – provide a tart contrast that cuts through the buttercream richness. A simple berry compote spooned alongside each slice works wonderfully.
Champagne or sparkling wine makes this feel like a true celebration dessert. The bubbles and acidity complement the creamy layers perfectly.
For a lighter accompaniment, serve with unsweetened whipped cream or crème fraîche on the side.
Storage & Reheating Tips
Refrigerator Storage
Store covered in the refrigerator for up to 1 day. The cake actually tastes better after the layers have time to meld together overnight.
Freezing
Not recommended once assembled, as the buttercream and ganache textures change when frozen. However, you can freeze the unfrosted joconde layers wrapped tightly for up to 1 month.
Room temperature
This cake must stay refrigerated due to the buttercream and fresh cream components. Remove from refrigerator 10-15 minutes before serving for best flavor.
Make ahead
Bake joconde layers 1 day ahead and keep wrapped at room temperature. Prepare buttercream and ganache the same day and refrigerate until assembly. Assemble and glaze the cake up to 1 day before serving.
Serving temperature
Serve slightly chilled for the best texture – the buttercream should be firm but not hard, and the ganache should be creamy.
More Beautiful Layer Cake Recipes
Here are some more stunning layer cakes to try next:
- Triple Chocolate Dulce de Leche Layer Cake is an over-the-top decadent treat for the chocolate lover.
- Black Forest Cheesecake Cake has layers of airy sponge cake and dense, creamy cheesecake for the best of both worlds.


Did you try this recipe? Leave a ⭐️ rating below and share it on Instagram.

Gemma Walker
The butter cream and ganache is great!
K
Beautiful! I cannot wait to try it. I could imagine it working with blueberries (blue) or raspberries (red) too.
Barbara Schieving
Thanks! Blue and Red would be so colorful. Let me know if you try it.
Sheltie Girl
You did a fabulous job on your cake. I love your creamsicle flavor.
Natalie @ Gluten A Go Go
Brownie
Wow! Your cake is GORGEOUS! I love the creamsicle idea. Great flavor combo!
Jaime
i love the idea of a creamsicle! your layers look so perfect, great job!
Rebecca
Sounds (and looks) delicious!
Madam Chow
It IS beautiful! And I hear you about the cost and the calorie count, although that doesn’t seem to be slowing me down much!
Claire
Creamsicle…such a childhood memory! This makes me want to get some at the grocery store. Your cake is so cute!
Gabi
Lovely cake- I love the creamsicle flavours!!!
Samira
I am super impressed by your straight cuts. The straightest I have seen yet. Flavors sound great too.
Awesome job!
Shari
Creamsicles and opera cake – how could you go wrong!
” REL=”nofollow” rel=”nofollow”>Whisk: a food blog